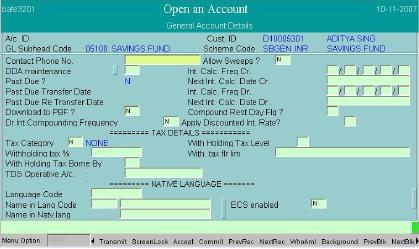
- Contact phone – enter contact phone no.
- Allow Sweeps - Enter Y if the sweep is allowed between accounts.
Interest Calc. Freq Cr and next three fields may not be entered.
- Daily Compounding Interest – Default N.
- Tax (TDS) details may not be required to be entered for SB A/c.
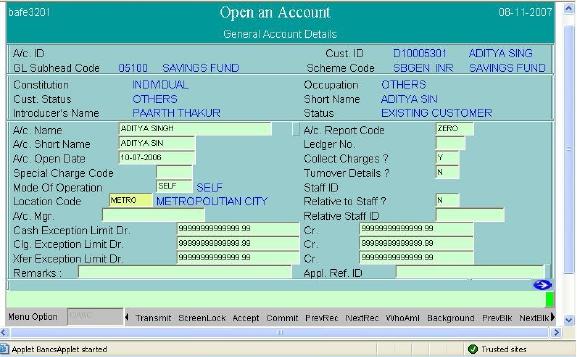
- Press F4 to go to Enter option field.
Scheme Details (S):
- Enter Option – Press F2, select S –Scheme Details option (5th from top)by pressing Shift+F4. Press F4 to get into scheme details. User can type S instead of pressing F2.
- Availing Nomination facility – default is N. Please make it Y if customer wishes to avail nomination facility in this account. After making the flag as Y, press F4 to go to Enter Option field. Other fields may not be entered, but these have been explained as below.
- Cheque Allowed – Default value is Y, which means cheque facility is allowed for this account.
- Charge for Cheque – Default value is Y, which means cheque book charges to be levied.
- Return Paid Cheques – May be kept blank.If cheques are tobe returned to the customer once they are paid, this value need to be filled in as Y.
- Paid Cheque Return – May be kept blank. Specify the frequency at which paid cheques would be returned the customer.
- A/c Health Code – Press F2 and select value from the list by pressing Shift+F4.
- Dr. Balance Limit – The maximum debit allowed in this account. Generally 0 (zero) in Staff SB/CA type of A/cs.
- Max. Allowed Limit – The ceiling limit on the sanctions for this account. May be kept 0 (zero) for SB/CA accounts.
- Debt. Acknowledgment Date – May be kept blank in Staff SB/CA type of A/cs.
For Transferred in A/c
User can enter the details for SB/CA accounts transferred from other branches
as follows-
- Interest Amount – Enter the pending Interest amount.
- Dr/Cr. – Enter C if the transfer interest amount is Credit, else enter D for Debit.
- Minimum Balance – Enter the minimum balance during the month of transfer which needs to be considered during next interest calculation. A/c Balance (0.00), Created By, Created On, Deleted (N) are display fields. These fields will be updated by the system automatically as and when operations take place in the a/c.
- Press F4 to go to Enter Option field.
Nomination Details (N)–
Enter Option - Press F2, select N – Nomination details option (3rd from
top) by pressing Shift+F4. Press F4 to get into nomination details. User
can type N instead of pressing F2.
Enter Nominee name (Mandatory)
Relationship (Mandatory)– e.g. Father, Mother etc. Press F2, select
relationship by pressing Shift+F4.
Reg. No. – Registration number for nominee is default generated by the
system.
Please enter Address. (Mandatory) Two lines are available for address.
City (Mandatory)– Type first 2-3 characters of city name press F2, select
city code from the list by pressing Shift+F4.
State (Mandatory)- press F2, select state by pressing Shift+F4. Country i
default IN (India).
Country (Mandatory) – Default is IN (India). Need not be changed. If user
wishes to change, press F2 and select country by pressing Shift+F4.
Postal Code (Mandatory)- Enter Pin/Postal Code.
Nominee Minor – Enter Y if nominee is minor.
Date of Birth – if nominee is minor, date of birth of minor must be entered.
Enter guardian’s details as specified in this page.
Press F4 to go to Enter option field
Joint A/C Holders’ Details (A) –
Enter Option - Press F2, select A – Related Party details option (1st from top) by pressing Shift+F4. Press F4 to get into option details.
The first screen displays the Main Account Holder’s Details. To enter joint
account holders’ details, press Down Arrow of keyboard.
- Relation Type (Mandatory) – Press F1 for help. The help displays variousvalues for relation codes. P (Power of Attorney), A (Authorised Signatory), L (letter of Authority), J (Joint Holder), G (Guarantor) etc. Press Enter on OK button or click mouse on it. Enter the value in this field.
- Relation Code – Press F2 and select the code from the list by pressing Shift+F4.
- Despatch Mode – If the account is enabled for statement, system gives user the option to send the statement to related parties added through this option. Press F1 for help. Enter the despatch mode in this field.
- Designation Code – Press F2 for list and select the code by pressing Shift+F4.
- Customer ID – If the related party (joint A/c holder) has a valid cust_id code, enter the same here. In that case other details of the party like address need not be entered.
- Name (Mandatory) – Enter name of the related party. This field need not be field if party’s cust_id is entered. If the cust_id of related party is not entered, Address, City, State, Country, Postal Code etc. of the related party need to be filled in If user wishes to enter one more related party details, press Down Arrow and follow the steps as described.
Press F4 to go to Enter option field. Press F10 to commit. System will display
14/15/16 account number according to Banks. Sometimes user may not get last digit
of account on the screen. Please note it, as it needs verification.

Verification of newly opened account
- The person who has opened the account through OAAC can not verify theaccount; as Maker and Checker concept is applicable in Finacle, therefore maker can not be the verifier.
- During verification of account, no details can be changed, as all the fieldsare write protected.
- To modify account details of newly opened account, use menu option OAACAU – function M (Modify).
Menu option – OAACAU
- Function – V.
- Temporary A/c No. – Enter the A/C No which is to be verified. User need not enter all 14/115/16 digits of account; user can enter short account no. of the account to be verified. If user forgot to note account no. after committing OAAC, user can retrieve it by pressing F2 in this field; select the account to be verified by pressing Shift+F4.
- Permanent A/c No. – must not be entered. Press F4 to bring account details. User will see General Details of account. Press F11 (Or click on Transmit button) twice to visit next page. When the user is in 3rd page, press F4 to go to Enter option field.
Options to Visit :
- Enter Option – type S and press F4 to visit scheme details. Press F4 to come back to Enter option field..
- Enter Option – If the user has entered nomination details for this account, the user should visit it. Type N and press F4 to visit nomination details. Press F4 to come back to Enter option field.
- Enter option – If the user has entered related party details like joint a/c details or authorised signatory etc, the user should visit the same. Type A and press F4 to visit Related Party Details. Press Up/Down arrow to scroll through the records. Press F4 to come back to Enter option field.
Press F10 to commit.
Summary of Options to Visit in CUMM & OAAC :
|
Add
|
Verify
|
Inquiry
|
Modify
|
Verify
|
CUSTOMER MASTER
|
CUMM
|
CUMM
|
CUMM
|
CUMM
|
CUMM
|
Function
|
A
|
V
|
I
|
M
|
V
|
Screens to be filled
|
G, E
|
|
|
|
|
Minor
|
M
|
|
|
|
|
NRI
|
N
|
|
|
|
|
Trade Finance
Customer
|
T
|
|
|
|
|
ACCOUNT MASTER
|
OAAC
|
OAACAU
|
ACM
|
ACM
|
ACM
|
Function
|
O
|
V
|
I
|
M
|
V
|
Screens to be filled
|
G, S
|
|
|
|
|
Nomination
|
N
|
|
|
|
|
Joint Account
|
A
|
|
|
|
|
It is needless to say that your feedback are always welcome and do drop our feedback on this topic.