Dear readers, we have already covered the topics on Customer ID creation in detail , accordingly we are presenting the process of account opening specially Savings and Current Accounts.
To open any customer account in Finacle, customer has to have a cust ID (menu option CUMM). All types of accounts can be opened through the one menu option i.e. OAAC. Opening of new account needs verification, which can be done through OAACAU.
Mandatory options in OAAC – G (General Details) & S (Scheme Details)
Optional options in OAAC – N (Nomination Details), A (Related Party Details) – for joint A/c holders’ details etc.
Menu option – OAAC
1. Function – O (Open).
- Customer ID – Enter cust id. If the short name of customer is known, type it and press F2. Select customer from the list by pressing Shift+F4.
- Currency – Default INR (Indian Repees) is displayed. The system willallow to open an account in currency which have been added in customer ID (option E-Customer Currency Details).
- Scheme Code – type SB and press F2. In the list, first all scheme codes under ‘Inoperative’ GL subhead will be listed. Press Control+D (page down) and select scheme code under ‘Saving ’ GL subhead ( as defined by your Bank) , by pressing Shift+F4.
- GL Subhead – system displays the GL subhead automatically.
- Permanent A/c No. – Nothing to be entered.
- Copy A/c No. – Nothing to be entered.
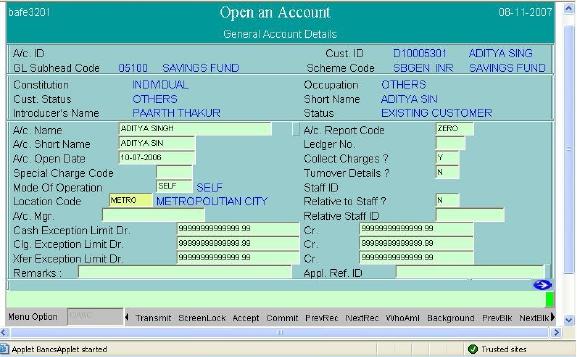
Press F4. Account Opening form will be displayed as shown below.
- Acct Name : System will automatically display the name of the customer entered in Cust-ID record. System allows changing the name, but system will raise related exception after committing the verification of account. If the user who is verifying the account has sufficient work class, he can override the exception by pressing F4 and verify the account
- Acct Short Name – This will be automatically displayed from Cust-ID. User can change the short name.
- A/c open Date – BOD date is displayed. User can change the date.
- Special Charge Code – This field is used to give preferential charges. Press F2 to see the list. Press Shift+F4 to select respective charge code.
- Mode of Operation (Mandatory) – Press F2 and select it by pressing Shift+F4.
- Location Code – Enter the population group/ area to which customer belongs
- e.g Metro, Urban etc as defined by your Bank . Press F2 and select it by pressing Shift+F4.
- Account Mgr. – User ID of Bank employee who is attached to this account as relationship manager can be entered. Only employee Ids which are available in the list can be selected. Press F2 and select it by pressing Shift+F4.
- Cash Exception Limit Dr. - Default values is 99999999999999.99. E.g. i .e user wishes that system should raise an exception if user tries to debit this account equal or above Rs.100000/- by cash, the user can enter 100000 in this field.
- Cash Exception Limit Cr. - Default values is 99999999999999.99. E.g. if user wishes that system should raise an exception if user tries to credit this account equal or above Rs.100000/- by cash, he can enter 100000 in this field.
- Clg. Exception Limit Dr. – Applicable for Debiting acount in clearing.
- Clg. Exception Limit Cr. – Applicable for Crediting acount clearing.
- Xfer Exception Limit Dr. – Applicable for transfer.
- Xfer Exception Limit Cr. – Applicable for transfer. If the limits as mentioned in point 15 to 20 are changed by the user, system will raise exception ‘Override Default Check’ when the user commit verification of account; if the verifying official has sufficient work class he can override the exception by pressing F4 key and authorize the account verification.
- Remarks – free text field.
- A/c Report Code – Default is ZERO.
- Ledger no. – may not be necessarily filled.
- Collect Charges – Default is Y. This means, system will collect account maintenance charges ( for example minimum balance charges etc) as and when they are due.
- Turnover Details- Default is N. May be kept as it is. This field is Y, if customer wishes to have account turnover details.
- Relative to Staff – Default is N.
- Relative Staff ID – If above field is set to Y, Staff Id in this field need to be entered. The employee having the staff id entered in this field is barred from entering any transaction in this account.
- Passbook/Statement – Valid values are P-Passbook, S-Statement, R-Deposit Receipt, B-Both P & S, N-None.
- Statement – If ‘Passbook/Statement’ field is set to S (Statement) or B (Both P&S), frequency for statement must be entered. There are five fields in statement frequency.
- Field 1:
yearly, Y – Yearly
- Field 2:
- Field 3: 1-Sunday, 2- Monday… 7- Saturday & 8 - No weekly of
- Field 4: Date of issue - 1 to 31
- Field 5: For Holiday N – Next, P – Previous, S – Skip
and yearly . Fields 2 ,3 & 4 are not required if frequency (field 1) is daily and
fortnightly Fields 2 & 4 are not required if frequency (field 1) is weekly
- Local Calendar – Default N. Not to be changed.
- Dispatch Mode – Press F1 for help. Fill appropriate value as per the codes
- defined in help.
- Next Print Date – Enter date on which next statement will be printed.
- Download to PBF – Default value is N. PBF stands for Positive Balance File, which required for handling offline transactions.
- Pay Interest – Default Y, means interest will be paid for this account.
- Collect Interest – Default Y, means interest will be collected from this SF/CA account, if TOD is granted.
- Customer Pref. Interest (Cr.) – We have already seen this field in currencym details (option E) in CUMM. Generally, in OAAC we should not fill any value in this field.
- Customer Pref. Interest (Dr.) – We have already seen this field in currency details (option E) in CUMM. Generally, in OAAC we should not fill any value in this field.
- Account Pref. Interest (Cr) – If user wishes to give any preferential interest in this account, over and above prevailing interest (explained in point 42) . User can enter negative value if user wishes to pay less interest. User should select SB Staff scheme code while opening staff’s SB A/c.
- Account Pref. Interest (Dr) – If user wishes to charge any preferential interest from this account, over and above prevailing interest. User can enter negative value if user wishes to charge less interest.
- Interest Cr A/c flag (Mandatory)– Default is S. Valid values are S-Original A/c, O-Operative A/c and T-Payment System. In most of the cases in SB A/cs, it will be S which means whenever system wants to pay interest in this account, it will credit it to this account only.
- Interest Dr A/c flag (Mandatory)– Same as above field.
- Int Rate Code – This code stores interest rate applicable for general public’s SB A/c. Changes in interest rates will be done by Data Centre. For staff A/c, this code will be automatically picked up by the system when the scheme code is selected for staff members. If the interest rate code or preferential interest in Dr/Cr are changed by the user, the system shall raise exception ‘Default Interest Parameter Change’ while committing the account verification; if the verifying user has sufficient work class, he can press F4 to accept the exception and verify the account.
- Account Pegged – Default is N, means system will pay prevailing rate of interest as and when they are updated by Data Centre. This field will be Y in case of FD’s in which system will pay interest at contracted rate given while opening an FD a/c.
- Pegging Review date – Enter the date on which the pegging for the account is to be reviewed. May not be required to change.
- Pegging Frequency (Months/days) – Enter months and days. May not be required for SB A/c. User can press F4 to go to the Enter Option field or Press F6 to go to Next Page.
- Contact phone – enter contact phone no.
- Allow Sweeps - Enter Y if the sweep is allowed between accounts.
- Daily Compounding Interest – Default N.
- Tax (TDS) details may not be required to be entered for SB A/c.
- Press F4 to go to Enter option field.
Scheme Details (S):
- Enter Option – Press F2, select S –Scheme Details option (5th from top)by pressing Shift+F4. Press F4 to get into scheme details. User can type S instead of pressing F2.
- Availing Nomination facility – default is N. Please make it Y if customer wishes to avail nomination facility in this account. After making the flag as Y, press F4 to go to Enter Option field. Other fields may not be entered, but these have been explained as below.
- Cheque Allowed – Default value is Y, which means cheque facility is allowed for this account.
- Charge for Cheque – Default value is Y, which means cheque book charges to be levied.
- Return Paid Cheques – May be kept blank.If cheques are tobe returned to the customer once they are paid, this value need to be filled in as Y.
- Paid Cheque Return – May be kept blank. Specify the frequency at which paid cheques would be returned the customer.
- A/c Health Code – Press F2 and select value from the list by pressing Shift+F4.
- Dr. Balance Limit – The maximum debit allowed in this account. Generally 0 (zero) in Staff SB/CA type of A/cs.
- Max. Allowed Limit – The ceiling limit on the sanctions for this account. May be kept 0 (zero) for SB/CA accounts.
- Debt. Acknowledgment Date – May be kept blank in Staff SB/CA type of A/cs.
For Transferred in A/c
User can enter the details for SB/CA accounts transferred from other branches
as follows-
- Interest Amount – Enter the pending Interest amount.
- Dr/Cr. – Enter C if the transfer interest amount is Credit, else enter D for Debit.
- Minimum Balance – Enter the minimum balance during the month of transfer which needs to be considered during next interest calculation. A/c Balance (0.00), Created By, Created On, Deleted (N) are display fields. These fields will be updated by the system automatically as and when operations take place in the a/c.
- Press F4 to go to Enter Option field.
Nomination Details (N)–
Enter Option - Press F2, select N – Nomination details option (3rd from
top) by pressing Shift+F4. Press F4 to get into nomination details. User
can type N instead of pressing F2.
- Enter Nominee name (Mandatory)
- Relationship (Mandatory)– e.g. Father, Mother etc. Press F2, selectrelationship by pressing Shift+F4.
- Reg. No. – Registration number for nominee is default generated by thesystem.
- Please enter Address. (Mandatory) Two lines are available for address.
- City (Mandatory)– Type first 2-3 characters of city name press F2, selectcity code from the list by pressing Shift+F4.
- State (Mandatory)- press F2, select state by pressing Shift+F4. Country idefault IN (India).
- Country (Mandatory) – Default is IN (India). Need not be changed. If userwishes to change, press F2 and select country by pressing Shift+F4.
- Postal Code (Mandatory)- Enter Pin/Postal Code.
- Nominee Minor – Enter Y if nominee is minor.
- Date of Birth – if nominee is minor, date of birth of minor must be entered.Enter guardian’s details as specified in this page.
Joint A/C Holders’ Details (A) –
Enter Option - Press F2, select A – Related Party details option (1st from top) by pressing Shift+F4. Press F4 to get into option details.
The first screen displays the Main Account Holder’s Details. To enter joint
account holders’ details, press Down Arrow of keyboard.
- Relation Type (Mandatory) – Press F1 for help. The help displays variousvalues for relation codes. P (Power of Attorney), A (Authorised Signatory), L (letter of Authority), J (Joint Holder), G (Guarantor) etc. Press Enter on OK button or click mouse on it. Enter the value in this field.
- Relation Code – Press F2 and select the code from the list by pressing Shift+F4.
- Despatch Mode – If the account is enabled for statement, system gives user the option to send the statement to related parties added through this option. Press F1 for help. Enter the despatch mode in this field.
- Designation Code – Press F2 for list and select the code by pressing Shift+F4.
- Customer ID – If the related party (joint A/c holder) has a valid cust_id code, enter the same here. In that case other details of the party like address need not be entered.
- Name (Mandatory) – Enter name of the related party. This field need not be field if party’s cust_id is entered. If the cust_id of related party is not entered, Address, City, State, Country, Postal Code etc. of the related party need to be filled in If user wishes to enter one more related party details, press Down Arrow and follow the steps as described.
Press F4 to go to Enter option field. Press F10 to commit. System will display
14/15/16 account number according to Banks. Sometimes user may not get last digit
of account on the screen. Please note it, as it needs verification.
Verification of newly opened account
- The person who has opened the account through OAAC can not verify theaccount; as Maker and Checker concept is applicable in Finacle, therefore maker can not be the verifier.
- During verification of account, no details can be changed, as all the fieldsare write protected.
- To modify account details of newly opened account, use menu option OAACAU – function M (Modify).
Menu option – OAACAU
- Function – V.
- Temporary A/c No. – Enter the A/C No which is to be verified. User need not enter all 14/115/16 digits of account; user can enter short account no. of the account to be verified. If user forgot to note account no. after committing OAAC, user can retrieve it by pressing F2 in this field; select the account to be verified by pressing Shift+F4.
- Permanent A/c No. – must not be entered. Press F4 to bring account details. User will see General Details of account. Press F11 (Or click on Transmit button) twice to visit next page. When the user is in 3rd page, press F4 to go to Enter option field.
Options to Visit :
- Enter Option – type S and press F4 to visit scheme details. Press F4 to come back to Enter option field..
- Enter Option – If the user has entered nomination details for this account, the user should visit it. Type N and press F4 to visit nomination details. Press F4 to come back to Enter option field.
- Enter option – If the user has entered related party details like joint a/c details or authorised signatory etc, the user should visit the same. Type A and press F4 to visit Related Party Details. Press Up/Down arrow to scroll through the records. Press F4 to come back to Enter option field.
Press F10 to commit.
Summary of Options to Visit in CUMM & OAAC :
Add
|
Verify
|
Inquiry
|
Modify
|
Verify
|
|
CUSTOMER MASTER
|
CUMM
|
CUMM
|
CUMM
|
CUMM
|
CUMM
|
Function
|
A
|
V
|
I
|
M
|
V
|
Screens to be filled
|
G, E
|
||||
Minor
|
M
|
||||
NRI
|
N
|
||||
Trade Finance
Customer
|
T
|
||||
ACCOUNT MASTER
|
OAAC
|
OAACAU
|
ACM
|
ACM
|
ACM
|
Function
|
O
|
V
|
I
|
M
|
V
|
Screens to be filled
|
G, S
|
||||
Nomination
|
N
|
||||
Joint Account
|
A
|
It is needless to say that your feedback are always welcome and do drop our feedback on this topic.


i came across this blog just today and found it very helpful
ReplyDeletei am new to banking and it is good to see the effort that has been put in creating this blog..
thanks..!
very helpful block... thank you
ReplyDeleteIt is really helpful. It has given me enough knowledge to analyse further. Thanks a lot.
ReplyDeleteJ.N. Singh
SWO - A,
Dena Bank.
amazing....very helpful.....but screen pics should be clear visible.
ReplyDeleteit is truly beneficial ....thanks a lot for this valuable share
ReplyDeleteIt is really helpful, it has provided me with enough knowledge to deal with CBS system introduced recently at my Bank ( The Jalandhar Central Coop. Bank Ltd).
ReplyDeleteOnly Point of mis-match is : Screen resolution must b BIT Clear and VISIBLE.
thanks
Lsgoraya I m from DCCB faridabad howz CBS implementation going on in or cb
ReplyDeleteITS VERY HELPFUL TO JOIN NEW BANKERS......THANKS
ReplyDeletehow to check if bank is paying tds and service tax to govt. or not? what is the finacle command?
ReplyDeletemostly comes in the sundry a/c of the branch only for staff members ......for other public not known the command but you can check it in ACI in Inquiry>>A/c id>>put option 2>>F4 the third column shows the tax deducted by the system of the customer a/c..you can press ctrl+d to know more with dates provided..that after 1.3.2012 this much 661/- tax deducted ..reply if found helpful..
DeleteIt would be helpful if u provide here the procedures for making an account joint in finacle.
ReplyDeleteGreat info! Thanks for such a informative and useful info, It help me a lot.:)
ReplyDeletefor more info click here
RD FD software | Credit Cooperative Society Software
thank you very much .i was facing
ReplyDeletedifficulty in grasping things told by my officer.your presentation is good.
How to modify the name if wrongly incorporated in oaac but having same custs
ReplyDeleteThis comment has been removed by the author.
ReplyDeleteExcellent
ReplyDeleteThankful to you for sharing the data, I have the best data about Online savings account.
ReplyDeleteAwesome information i found here. I really admire to see your quality article. I will look forward to read your informative blog.
ReplyDeleteDownload Tradeinsta Demat Account App
In oaac menu why C is there in function, if a customer want to open a fd of 10000 but 100 nos then what will be the shortcut.
ReplyDeleteThis is so helpfull
ReplyDeleteNice
ReplyDeleteThank you so much for sharing all this wonderful info with the how-to's!!!! It is so appreciated!!!You can find out more on Online Bank
ReplyDelete